Table of contents
What are Persistent Volumes in k8s?
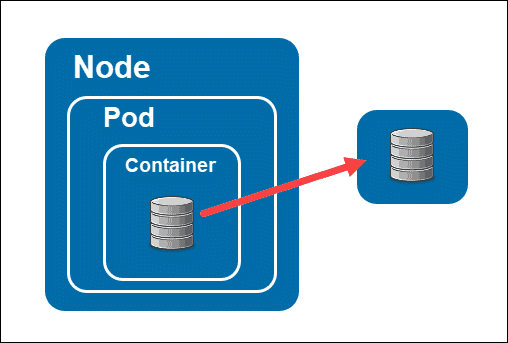
A Persistent Volume is a piece of network-attached storage (NAS) or block storage provisioned by an administrator in a Kubernetes cluster. It represents a physical storage resource in the infrastructure, such as a disk in a cloud provider or a network file system (NFS). PVs have a lifecycle independent of any specific Pod, meaning they can persist data even if Pods is deleted or rescheduled.

Key features and concepts related to Persistent Volumes include:
Provisioning: Administrators can create PVs using various storage mechanisms, such as dynamic provisioning, manual provisioning, or by referencing an existing storage resource. The specifics depend on the underlying infrastructure provider and the storage classes available.
Access Modes: PVs can be configured with different access modes, which define how the storage can be accessed by Pods. The common access modes are ReadWriteOnce (RWX), ReadOnlyMany (ROX), and ReadWriteMany (RWM), allowing for single-node read-write access, multiple-node read-only access, and multi-node read-write access, respectively.
Capacity and Storage Classes: PVs have a specified storage capacity, indicating the amount of storage available. Storage Classes provide a way to define different classes of storage with varying performance characteristics and provisioning policies. PVs can be associated with specific Storage Classes to control how they are dynamically provisioned.
Claims and Binding: To use a Persistent Volume, a Pod must request storage by creating a Persistent Volume Claim (PVC). PVCs are requests for specific storage characteristics, such as capacity and access mode. When a PVC is created, Kubernetes attempts to find a suitable PV that matches the requested characteristics. If a matching PV is found, it is bound to the PVC, and the Pod can use the PV as a volume.
Reclaim Policies: PVs have a reclaim policy that determines what happens to the storage resource when it is released from the PVC. The reclaim policies include Retain, Delete, and Recycle, allowing administrators to choose whether to retain the data, delete it, or perform some custom cleanup action.
Persistent Volumes provide a way to manage and abstract the underlying storage infrastructure, making it easier to manage storage for applications running in Kubernetes. They allow for dynamic provisioning, sharing of storage resources across multiple Pods, and decoupling storage from the lifecycle of individual Pods.
Let's Do Some Task base on Persistent Volume.
Task1
Add a Persistent Volume to your Deployment todo app.
Create a Persistent Volume using a file on your node.
This is a piece of storage in your cluster that can be dynamically provisioned and claimed by a Pod. To create a Persistent Volume, you can use a file on your node. You can create a YAML file, called pv.yaml, that defines the Persistent Volume. This file should include the size of the storage, the access modes, and the path to the file on your node. Here's a template you can use:
  apiVersion: v1
  kind: PersistentVolume
  metadata:
    name: pv-todo-app
  spec:
    capacity:
      storage: 1Gi
    accessModes:
      - ReadWriteOnce
    persistentVolumeReclaimPolicy: Retain
    hostPath:
      path: "/tmp/data"
Apply the updates using the command
kubectl apply -f pv.yaml
Create a Persistent Volume Claim that references the Persistent Volume.
A Persistent Volume Claim is a request for storage by a user. It specifies the required size and access modes of the storage and is automatically bound to a matching Persistent Volume. You can create a YAML file, called pvc.yaml, that defines the Persistent Volume Claim.
  apiVersion: v1
  kind: PersistentVolumeClaim
  metadata:
    name: pvc-todo-app
  spec:
    accessModes:
      - ReadWriteOnce
    resources:
      requests:
        storage: 500Mi
Apply the updates using the command
kubectl apply -f pvc.yaml
Update your deployment.yml file to include the Persistent Volume Claim.
To use the Persistent Volume Claim in your Deployment, you need to update your Deployment file, deployment.yml. You should add a volume and a volumeMount section to the container definition, which references the Persistent Volume Claim.
            volumeMounts:
              - name: todo-app-data
                mountPath: /app
        volumes:
          - name: todo-app-data
            persistentVolumeClaim:
              claimName: pvc-todo-app
Apply the updated deployment using the command
kubectl apply -f deployment.yml
Verify that the Persistent Volume has been added to your Deployment by checking the status of the Pods and Persistent Volumes in your cluster. Use this commands
  kubectl get pod -n=todoapp
  kubectl get pv
These commands will show the list of Pods and Persistent Volumes in your cluster.

Task 2:
Accessing data in the Persistent Volume,
Connect to a Pod in your Deployment using the command
kubectl exec -it -n=todo-app todo-app-5f8bd9f88-bdrpk -- /bin/bash
Below inside the app folder create a new file named demo.txt
Also, exit from the pod using the exit command.

Verify that you can access the data stored in the Persistent Volume from within the Pod
Delete the pod which we used in the above step and create a new pod using the command
  kubectl delete -f deployment.yaml
  kubectl apply -f deployment.yaml
Go inside a pod using kubectl exec command, then go to the app folder and check the demo.txt file.
kubectl exec -it -n=todo-app todo-app-5fc45bb7bc-r687q -- /bin/bash
Thankyou for reading the blog......
